Kubernetes Cluster GitOps with GitLab Agent for Kubernetes and Tanzu Community Edition in vSphere
Provision Kubernetes clusters declaratively with GitLab and Cluster API
Background
GitOps has been a very popular deployment pattern for large distributed systems in recent past. It gives the utmost clarity on what the declared state is, when changes have occurred, and who made the changes. It's easier to collaborate, replicate across environments, and rollback in the event of a failure.
Most often, GitOps is applied either to infrastructure through Infrastructure as Code tools like Terraform or to applications through Kubernetes continuous deployment tools.
Kubernetes has its own capability to track current state against desired state and is constantly reconciling that to avoid configuration drift. Couple that with a CD tool that constantly reconciles desired state against a source code repository, then you have the ultimate GitOps engine.
What about Terraform? Terraform keeps track of state through a state file. It's generated after a Terraform configuration is applied. But what happens if that state begins to drift? One could always create tools to address the state drift and they'll probably work for a while, but maintenance can be a nightmare. What if we could use the great scheduler built into Kubernetes coupled with a GitOps tool to constantly reconcile desired state?
This is where the GitLab Agent for Kubernetes and Cluster API allow you to use Kubernetes to manage Kubernetes infrastructure. Cluster API will define the desired state in yaml manifests, and the GitLab Agent for Kubernetes will enforce the continued desired state inside of a Kubernetes management cluster.
GitLab Agent for Kubernetes
The GitLab Agent for Kubernetes is the latest secure way to connect your Kubernetes clusters to a GitLab instance. It does this by running an agent deployment pod from within your cluster that connects to the GitLab instance with a private cluster-specific access token. This phone-home approach is much more secure than having your cluster exposed and accessible via a cluster certificate.
Once the cluster is connected, you can use the cluster for deployments in GitLab CI as well as declaratively apply manifests against your cluster in pull-based GitOps flow. You have control over which repositories and files/folders the agent will track based on a list of globs.
In this post, we will use GitLab.com

Cluster API via Tanzu Community Edition
Tanzu Community Edition is a Kubernetes management system that uses Cluster API to declaratively provision and lifecycle-managed CNCF conformant clusters. It's completely free to use and allows you to deploy clusters to vSphere, AWS, Azure, or a local Docker daemon.
In order to provision workload clusters that are declaratively maintained, a management cluster needs to be stood up to enforce the desired state.
Setup
Management Cluster
You have several infrastructure options. For this walk-through, I'll use vSphere.
Prerequisites
There are a few steps that need to occur prior to deploying a management cluster that are available in the Tanzu Community Edition documentation.
In short, you need to do the following:
- Install the Tanzu CLI in your workstation (M1 Macs are currently unsupported for initial provisioning)
- Download an OVA, upload to vSphere, and convert to template
- Install Docker Desktop (if not already installed) so the embedded kind cluster can use Kubernetes and Cluster API to provision your management cluster
- Create an SSH key (if not already available)
- Optional: create a new VM Folder, resource pool, network, and/or datastore dedicated to Tanzu
- Ensure DHCP and internet egress are configured for the desired network
Once these prep steps are followed, you can follow the full steps to deploy a management cluster or follow the quick lightweight installation instructions below.
Lightweight Install
At the time of writing this post, I used Tanzu Community Edition v0.2.1 and I followed the UI instructions via:
$ tanzu management-cluster create --ui
Validating the pre-requisites...
Serving kickstart UI at http://127.0.0.1:8080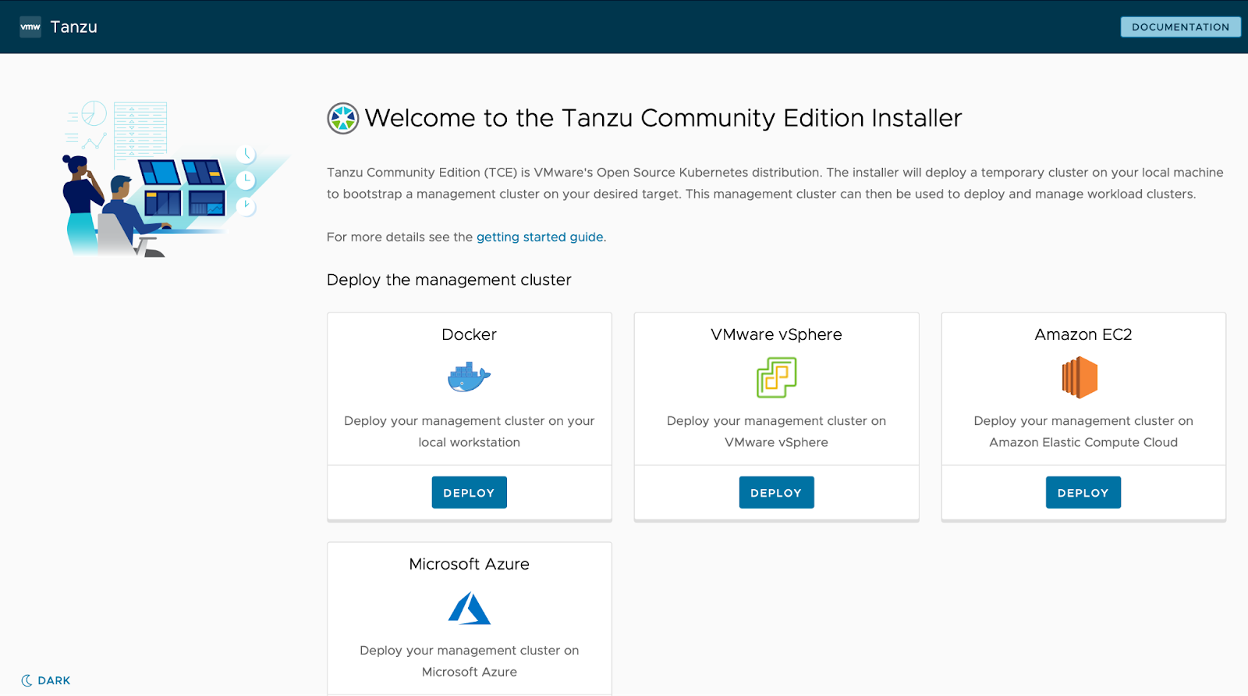
IaaS Provider
- Sign in with your vCenter server, username with admin privileges, and password
- Select the vSphere Datacenter you want to use
- Provide the public SSH key you would want to use to SSH into the provisioned VMs for troubleshooting
Management Cluster Settings
- Select Development for a single control plane node with an instance type of at least
medium (cpu: 2, ram: 8 GB, disk: 40 GB) - Provide a name for the management cluster, like
tce-mgmt - Leave Machine Health Checks enabled for better resiliency or uncheck for a lighter footprint
- Select Kube-vip for a simple VIP address
- Provide either an available IP address or a FQDN that points to an available IP address - this will be used by the single node or assigned to the ETCD leader in the HA production mode
- Select at least
medium (cpu: 2, ram: 8 GB, disk: 40 GB)for the Worker Node Instance Type for minimally optimal performance - For a lighter footprint, leave Enable Audit Logging unchecked
(Skip) VMware NSX Advanced Load Balancer
You can skip the VMware NSX Advanced Load Balaner section, unless you selected NSX Advanced Load Balancer (Avi) in the previous step instead of Kube-vip.
(Skip) Metadata
You can skip the Metadata section.
Resources
- Select a VM Folder in which you want the VMs to reside
- Select the Datastore you want the VMs to use for Kubernetes system storage - shared storage, like NFS or iSCSI, is ideal across several hosts
- Select the Cluster or Resource Pool where you want the cluster to live
Kubernetes Network
- Select your desired DHCP-enabled vSphere Network Name
- Leave the Cluster Service CIDR and Cluster Pod CIDR in their default values
- Configure Proxy Settings if they are needed for internet egress
(Skip) Identity Management
For a lightweight installation, skip the Identity Management section.
OS Image
Select the templated OVA image you uploaded in the initial setup.
(Skip) Register TMC
Unless you have a TMC account you want to use to automatically attach and manage clusters, you can skip the TMC section.
Start Cluster Deployment
After completing the configuration steps and reviewing, you can select the Deploy Management Cluster button in the UI. You can also reference the command provided that points to a manifest file containing your configuration. You may want to save that configuration in a safe place and reference that rather than building through the UI.
If all is configured correctly, you will start to see VMs provisioned in your vSphere environment that matches the naming convention you provided earlier.
If you are installing this on top of a vSphere 7+ environment, you may have a couple prompts about using Tanzu native to vSphere. You can say no to those prompts to install the lightweight Tanzu Community Edition on top of vSphere 7.
When finished, you can verify all works by running:
$ tanzu management-cluster getYou should also be able to see that no workload clusters have been created:
$ tanzu cluster list
NAME          NAMESPACE  STATUS    CONTROLPLANE  WORKERS  KUBERNETES        ROLES   PLAN
The Tanzu CLI will also add your management cluster to your local kubeconfig and set the context. This context will be needed for registering your GitLab Agent for Kubernetes. You should be able to see the deployed nodes:
$ kubectl get node
NAME                             STATUS   ROLES                  AGE   VERSION
tce-mgmt-control-plane-28rfp     Ready    control-plane,master   24h   v1.21.2+vmware.1
tce-mgmt-md-0-745b858d44-q9m8r   Ready    <none>                 24h   v1.21.2+vmware.1
$ kubectl get clusters
No resources found in default namespace.
GitLab Agent for Kubernetes
The GitLab Agent needs to be set up within a GitLab project. This can be a shared project used by many others or a single repo used for one purpose. Since this is meant to manage workload clusters and nothing else, I recommend using a single repo to manage the GitLab Agent for Kubernetes as well as store cluster manifests used by the management cluster via the agent.
In either a new project or in an existing repo meant to store cluster configurations, create a config file under .gitlab > agent > clusters > (your cluster name) > config.yaml. For now, this can be an empty yaml file.
$ echo "---" > ./.gitlab/agent/clusters/tce-mgmt/config.yamlOnce this is committed and pushed to GitLab, go to your project's Infrastructure > Kubernetes clusters settings.
Select Actions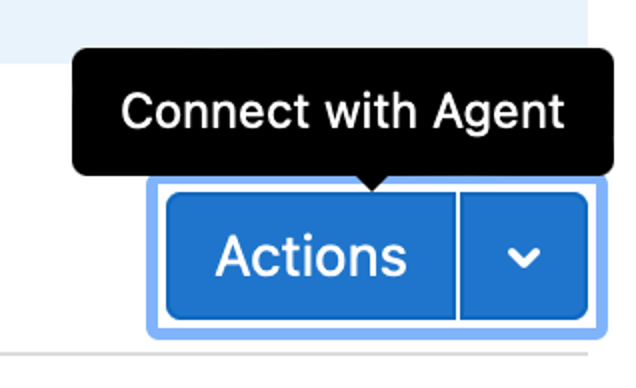
And select the cluster name you used in the ./.gitlab/agent/clusters/demo/config.yaml file and select Register.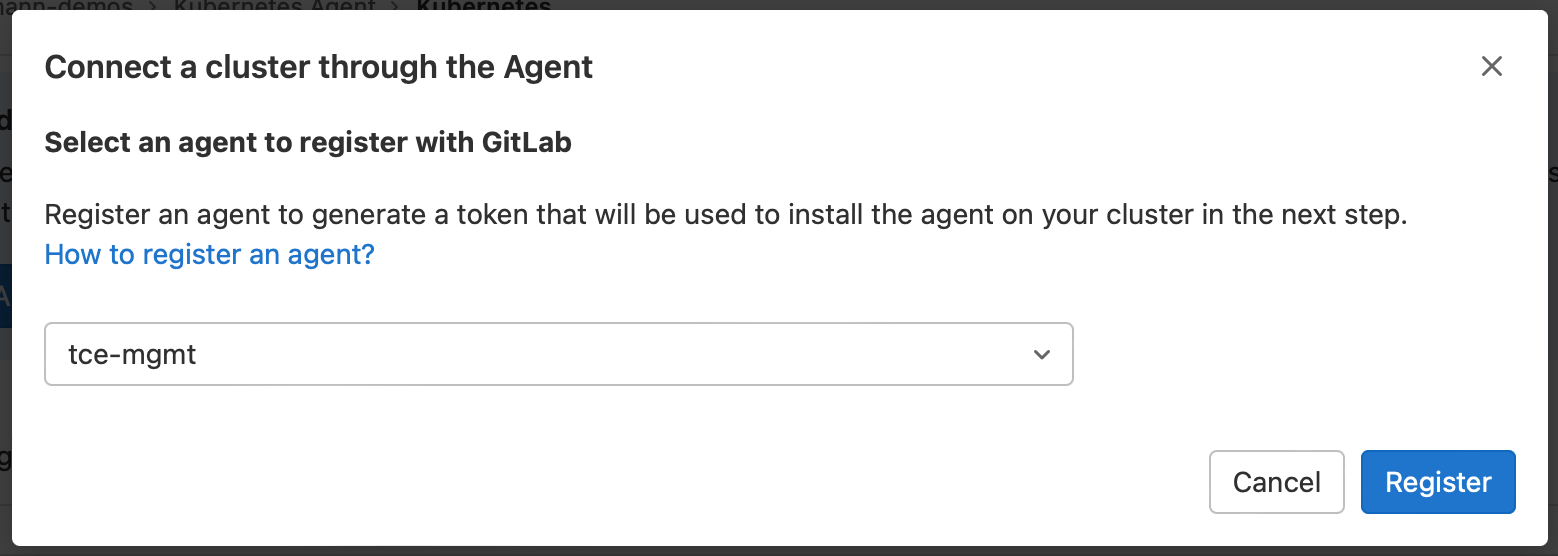
This will automatically create an access token and provide instructions to connect the cluster by running a deployment within the management cluster.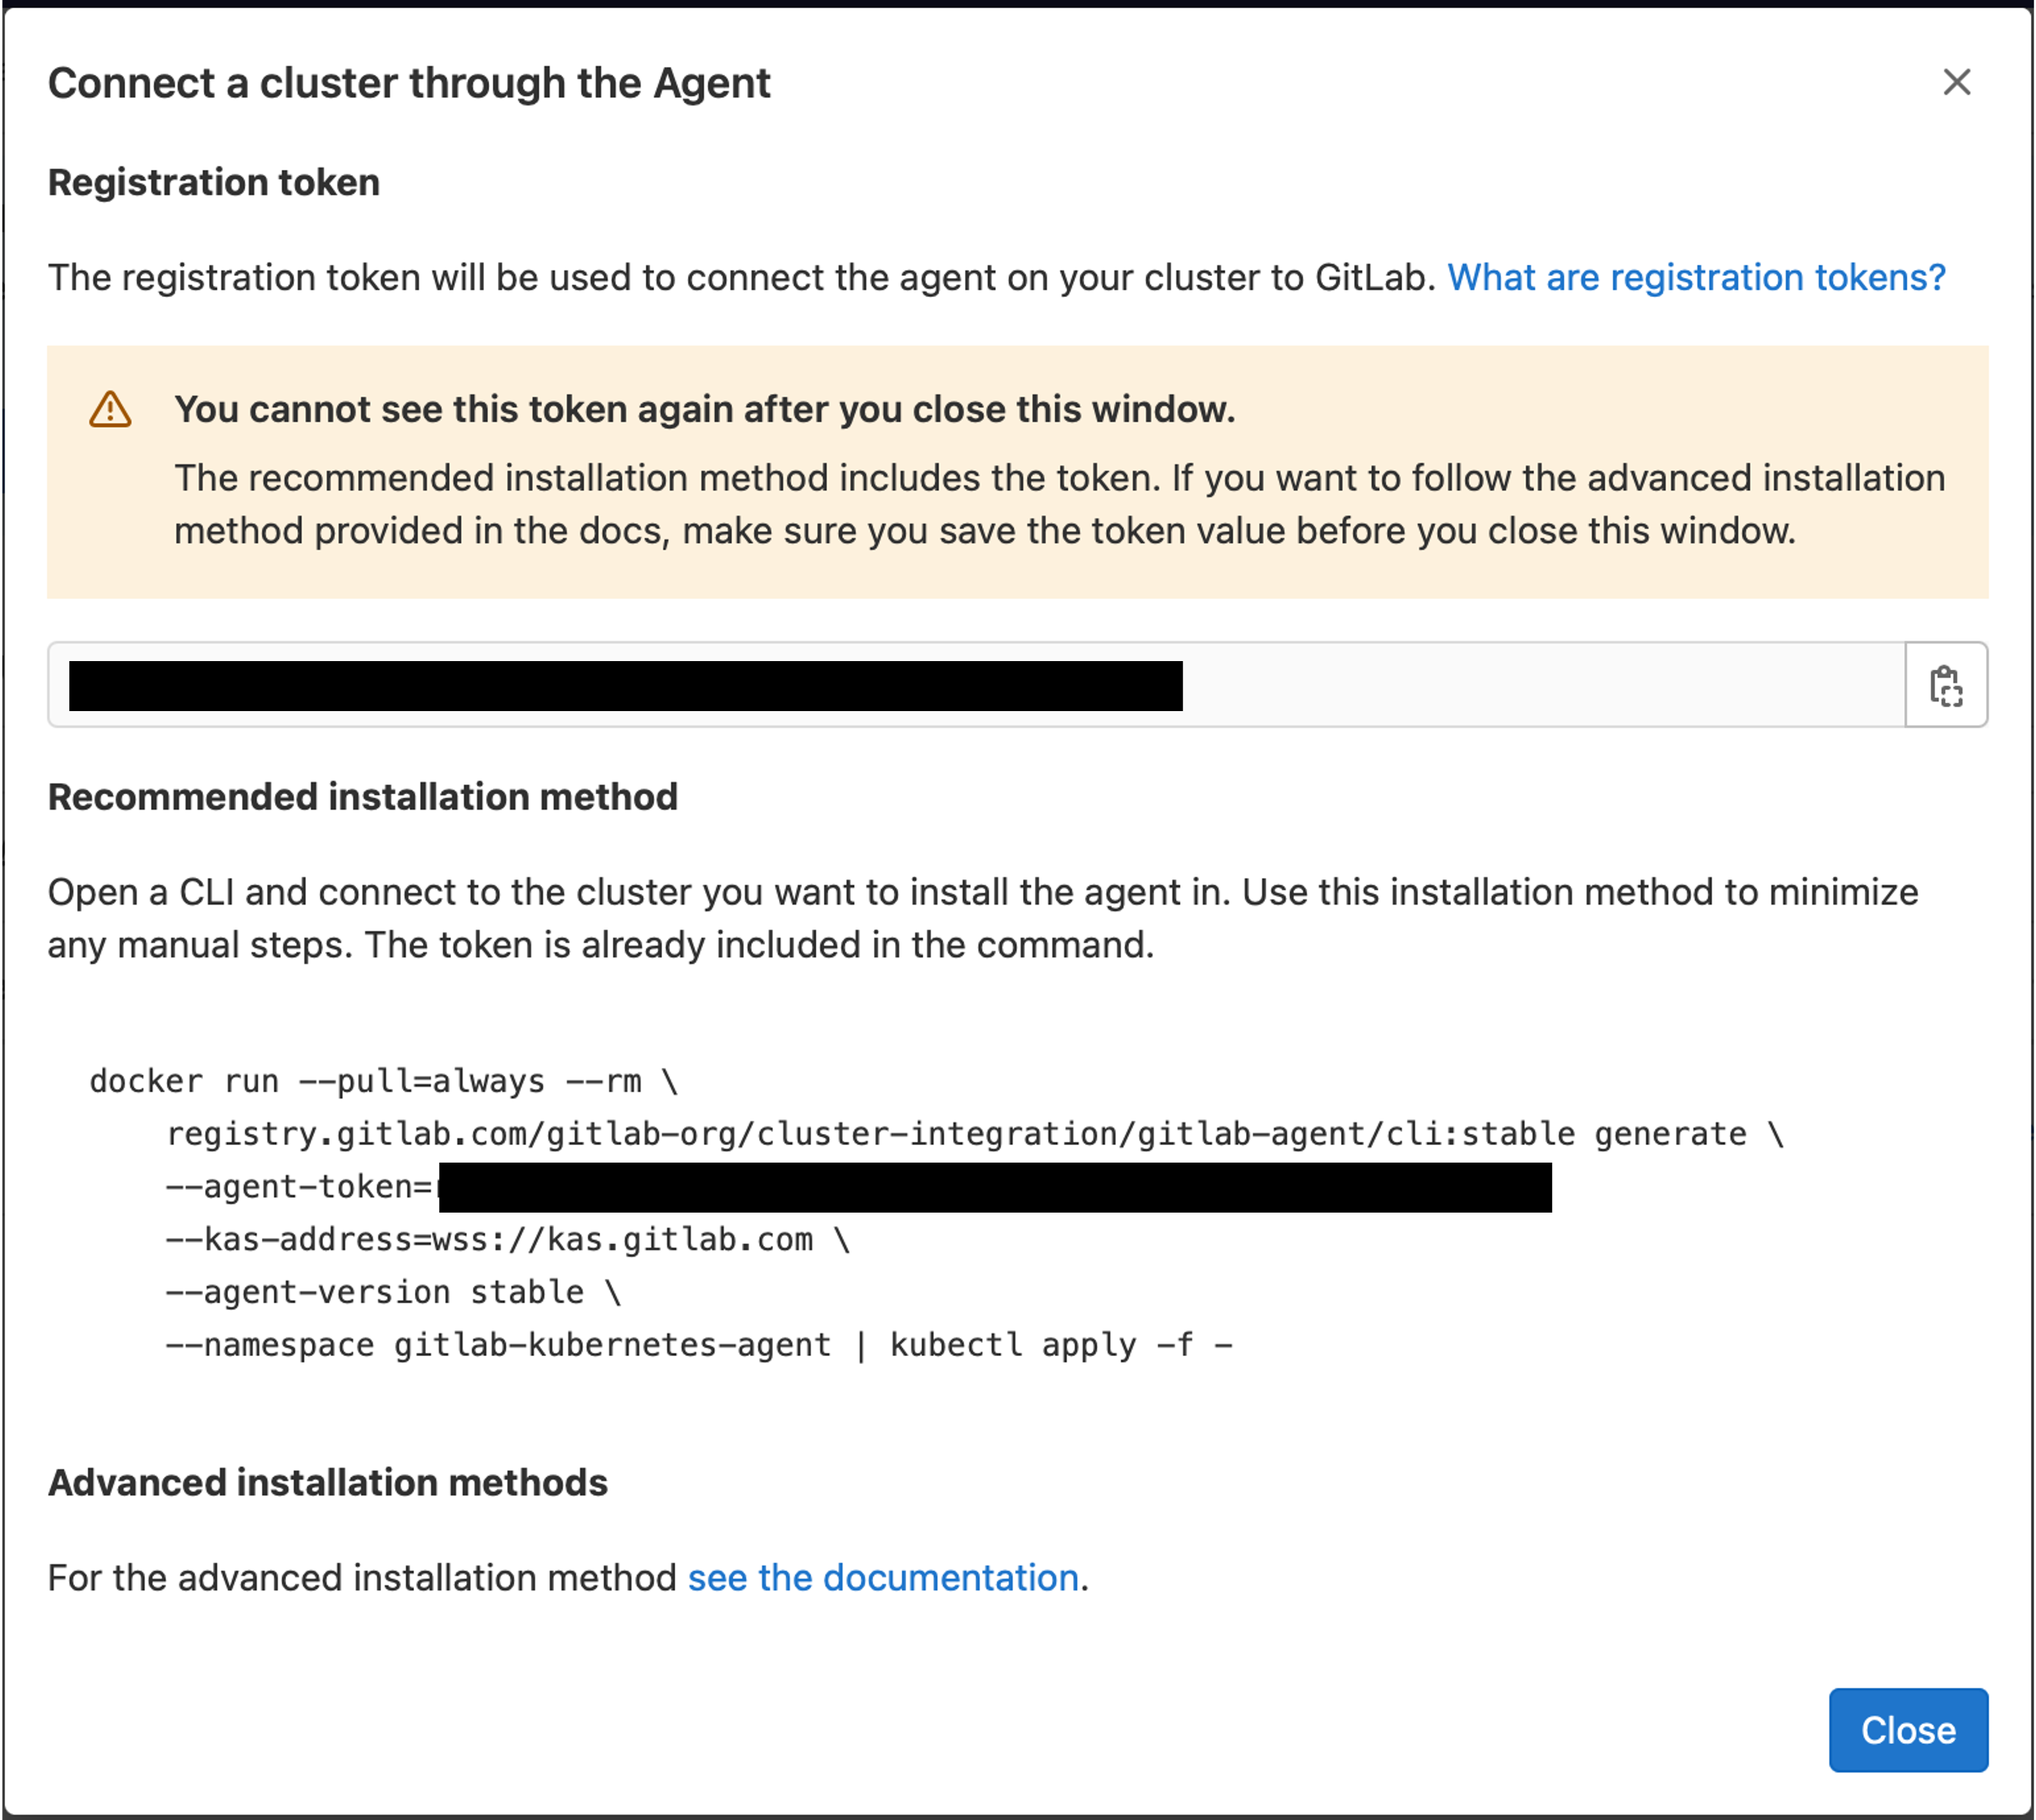
The simplest way to do this is run the docker command provided. Before doing this, ensure your Kubernetes context is still pointing to your management cluster.
After running this command, you should be able to see a pod running in the newly created gitlab-kubernetes-agent namespace.
$ kubectl -n gitlab-kubernetes-agent get all
NAME                                READY   STATUS    RESTARTS   AGE
pod/gitlab-agent-7576466bf5-hwpxt   1/1     Running   0          3h56m

NAME                           READY   UP-TO-DATE   AVAILABLE   AGE
deployment.apps/gitlab-agent   1/1     1            1           3h56m

NAME                                      DESIRED   CURRENT   READY   AGE
replicaset.apps/gitlab-agent-7576466bf5   1         1         1       3h56m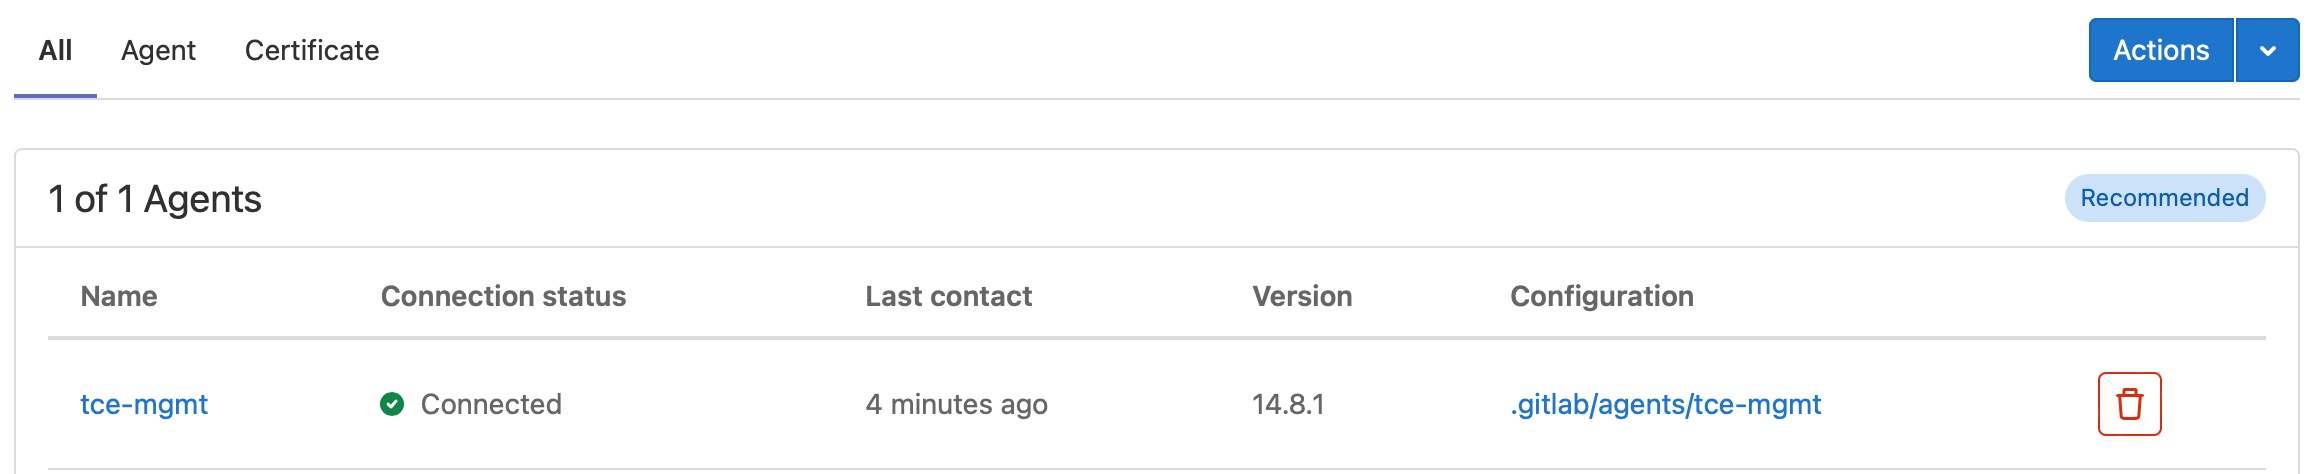
Creating a Cluster
Generate Manifest
Now that the repository is managing a GitLab Agent for Kubernetes, a new Tanzu Kubernetes cluster manifest file can be created and committed.
One of the easiest ways to do this is to define a number of cluster variables in a manifest file. I like to keep these variables at the top level of the project in cluster-vars.yaml. I also like to track my clusters in a clusters folder.
$ tanzu cluster create my-cluster -f ./cluster-vars.yaml --dry-run -v 9 > \
./clusters/my-cluster.yamlkubectl apply -f ./clusters/my-cluster.yaml if we wanted to, but we want to use the GitLab Agent for Kubernetes to use the GitOps flow instead.$ cat ./clusters/my-cluster.yaml
apiVersion: cluster.x-k8s.io/v1alpha3
kind: Cluster
metadata:
annotations:
osInfo: ubuntu,20.04,amd64
tkg.tanzu.vmware.com/cluster-controlplane-endpoint: my-cluster.com
tkg/plan: prod
labels:
tanzuKubernetesRelease: v1.21.2---vmware.1-tkg.1
tkg.tanzu.vmware.com/cluster-name: my-cluster
name: my-cluster
namespace: default
spec:
clusterNetwork:
pods:
cidrBlocks:
- 100.96.0.0/11
services:
cidrBlocks:
- 100.64.0.0/13
controlPlaneRef:
apiVersion: controlplane.cluster.x-k8s.io/v1alpha3
kind: KubeadmControlPlane
name: my-cluster-control-plane
infrastructureRef:
apiVersion: infrastructure.cluster.x-k8s.io/v1alpha3
kind: VSphereCluster
name: my-cluster
...
$ tanzu cluster list
NAME NAMESPACE STATUS CONTROLPLANE WORKERS KUBERNETES ROLES PLAN$ kubectl get clusters
No resources found in default namespace.
Update GitOps Config
Before pushing these changes, let's tell the GitLab Agent for Kubernetes to track only the clusters folder.
cat ./.gitlab/agent/clusters/tce-mgmt/config.yaml
---
gitops:
  manifest_projects:
  - id: "my-user-or-group/my-project"
    paths:
      - glob: '/clusters/*.yaml'
Commit & Push
Now that the cluster manifest file and the GitOps config are set, commit and push the code.
Verify
Tanzu Clusters
Once the changes propagate, you should be able to see your new cluster show up in the Tanzu CLI.
$ tanzu cluster list
NAME          NAMESPACE  STATUS    CONTROLPLANE  WORKERS  KUBERNETES        ROLES   PLAN
  my-cluster  default    creating  0/3           0/3      v1.21.2+vmware.1  <none>  prod
$ kubectl get cluster,machine
NAME           PHASE
my-cluster     Provisioned

NAME                                                          PROVIDERID                                       PHASE     VERSION
machine.cluster.x-k8s.io/my-cluster-control-plane-ppjhp           vsphere://42397d3d-b2da-5449-2549-4f3e203a3aed   Running   v1.21.2+vmware.1
machine.cluster.x-k8s.io/my-cluster-md-fmdr7           vsphere://42397dac-2263-844e-9251-95441ec9d64e   Running   v1.21.2+vmware.1
Cluster Node VMs
You should also see VMs created in vSphere.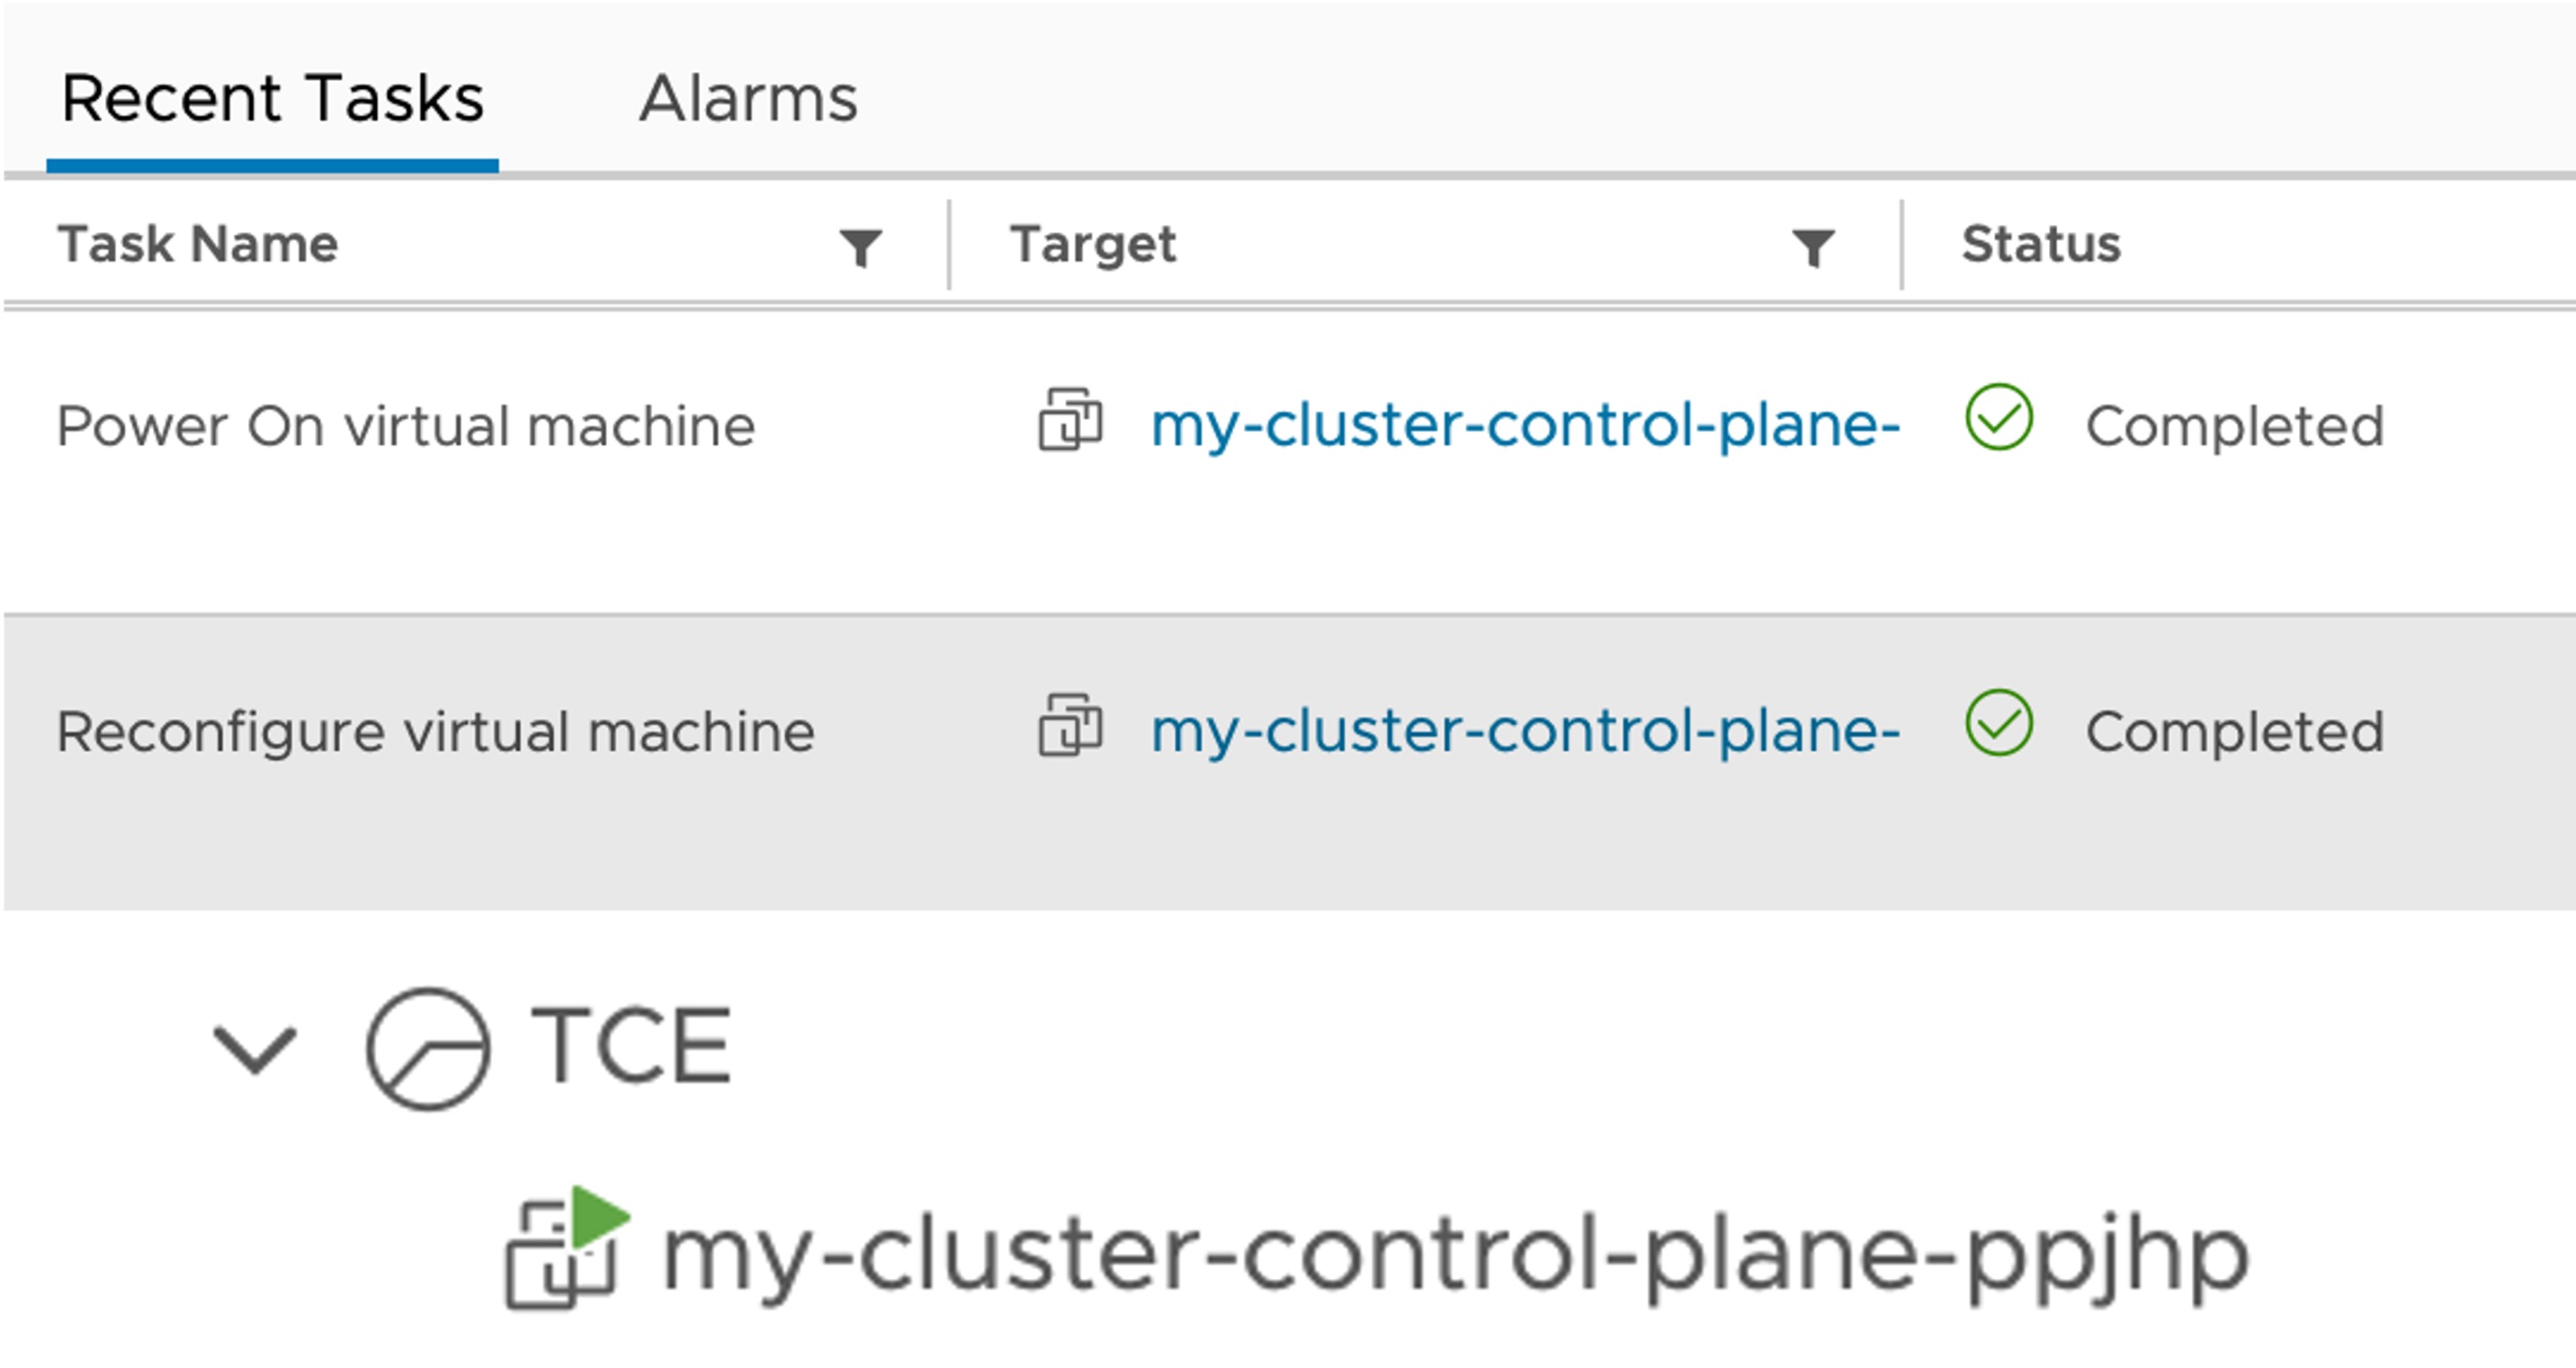
Access
Once the workload cluster has finished provisioning, you can access it with the following command:
$ tanzu cluster kubeconfig get my-cluster --adminThis will add client certificate credentials for the cluster into your local Kube config. If you configured an SSO integration, this will still work as the Tanzu admin, but you can omit the --admin flag to use SSO login, but you won't have any groups to be able to do anything.
Troubleshooting
Agent Logs
If you experience issues with the cluster provisioning, you might want to check the logs of the GitLab Agent for Kubernetes.
$ kubectl -n gitlab-kubernetes-agent logs gitlab-agent-XXXXX-XXXSummary
Now that the plumbing exists, you can use GitLab to manage your desired Kubernetes cluster state, declaratively upgrade your cluster to new versions, and scale up or down with the benefits of Git.