How to Build a Light Stack with a Raspberry Pi and Sense Hat
Build an andon light stack with the Raspberry Pi and Sense Hat and control them with the Pingum APIs
Cross posted from original Pingum.io blog.
Earlier this month, we were asked about if Pingum could integrate with physical lights to show current status. Tracking current status is a common need across industries - dispatching, food service, logistics, and manufacturing, to name a few.
Although we built Pingum to handle workflows and end user notifications, Pingum has open developer APIs, so this could be achieved relatively simply with the proper equipment and a little custom development.
This specific conversation was asking about andon systems. To accommodate what they were asking of us, I thought I would do a little research and give an example of how they might build this on their own.
In this hands-on post, we will walk through setting up a simple andon system using a Raspberry Pi. Before diving in, let's levelset on what andon systems are.
Background
What is an andon system?
Andon is a system originating from Toyota to empower manufacturing operators to alert management of recognized issues that are stopping them from being productive.
Andon systems are a key component of lean manufacturing. They give you peace of mind when everything is running smoothly, and they give you visibility into which operators having issues on the manufacturing floor. Whether you're running large batches, continuous flow, or specialized jobs, having the confidence your processes are running as planned puts your mind at ease.
Andon systems typically measure unplanned downtime but could also be planned. These issues are critical to the productivity of the whole line and should be addressed as soon as possible.
The status of the andon system is managed through physical light stacks, which gives you the ability to see if a given station is operational, but you're typically limited to only a few light colors to represent the status.
Pingum allows you to expand statuses and provide extra context around what the issue is. Rather than using a handful of colors, Pingum lets you define statuses, assign tags, and automatically notify the people who need to react.
What is the cost of downtime?
According to a Rand Group study, IT system downtime of one hour can cost 81% of businesses over $300,000. This could be from paying workers during the hour, maintenance costs, missed sales - all the aspects of not being able to operate as a business. This doesn't even touch on the tarnished customer reputation you risk.
Another study describes how the average manufacturer deals with 800 hours of downtime a year. With this much downtime, how can you start to manage the risk of unplanned downtime?
Andon systems are the best insurance policy to make sure you address small issues before they become business critical, and Pingum is a great way to get started.
Why use a Raspberry Pi to automate an andon system?
A Raspberry Pi is a great cost-effective way to explore automating your andon light stack. They are small, light-weight computers that can connect to sensors and LED lights.
In a future post, we will show you how to automate the creation of andon issues as Pingum events by using a Raspberry Pi with sensors. For now, we will use the Raspberry Pi to control LED lights that simulate a traditional andon light stack.
If this is your starting point, you may eventually want to graduate to a more advanced andon light stack, but the integration with Pingum will still apply.
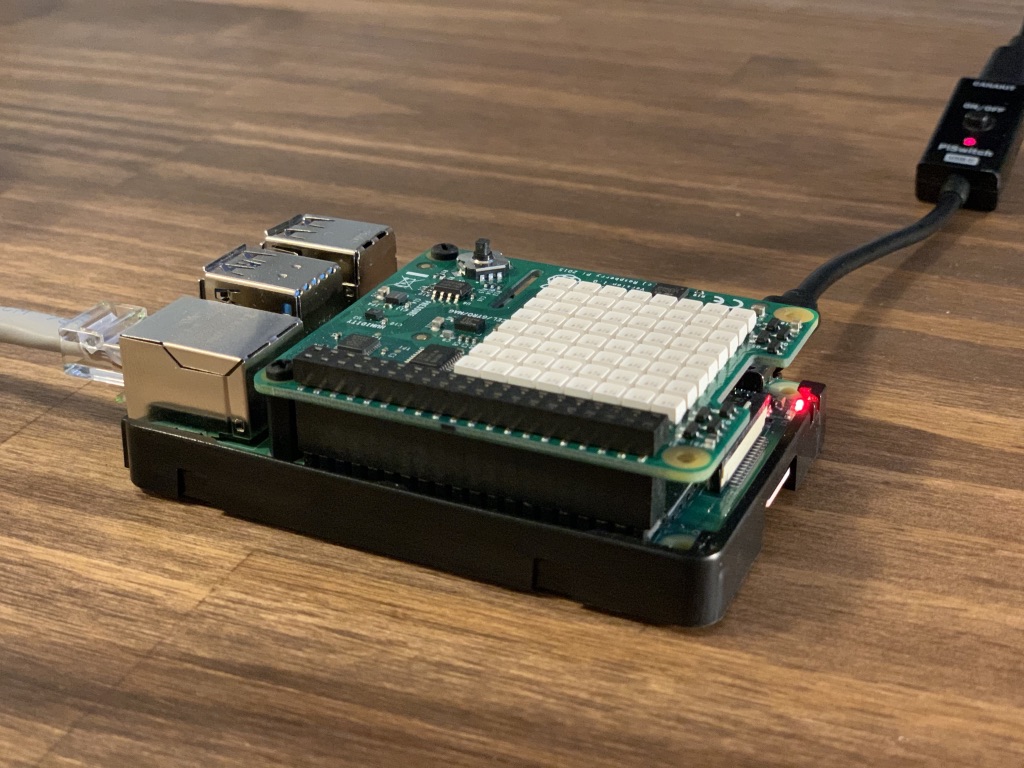
I was looking for a cost-effective way to highlilght the capabilities of an andon system integrated with Pingum. So, to show how easy it is to get started, we will use a Raspberry Pi with a Sense HAT.
Supplies

Raspberry Pi 4 4GB Kit
I decided to buy the latest Raspberry Pi - the Raspberry Pi 4 Model B. You can get it with various amounts of RAM. I went with the 4GB version. This is probably overkill. You could use the Raspberry Pi 3 Model B or a Raspberry Pi 4 with less memory. Not many resources are needed to change LED lights based on data provided by Pingum, but I have future plans for this Raspberry Pi that could pay off.
Note: I bought this knowing I would NOT use the case while using the Sense HAT. With the support spacers installed, I could not snap on the side of the case. That didn't really bother me though.
Amazon: https://www.amazon.com/gp/product/B07V5JTMV9
Purchase price: $99.99
Sense HAT
I wanted a simple way to read data from sensors, have some manual user input, and lights for statuses. The Sense HAT checked all the boxes in a ready-to-use board.
Amazon: https://www.amazon.com/gp/product/B014HDG74S
Purchase price: $37.25
Monitor & keyboard
To setup the initial operating system for the Raspberry Pi, I used a monitor and a combined keyboard/mouse I already had.
Once installed, I didn't use the monitor or keyboard.
SSH or RDP
After setting up the operating system, I enabled SSH. This is great for quick remote bash sessions or SCP file transfer.
Because I am a graphically-driven person, I also enabled RDP through xrdp so I could use my favorite Remote Desktop Protocol client.
If you would rather use a graphical UI remotely, you can install xrdp on the Raspberry Pi after installing the operating system using this command:
$ sudo apt-get install xrdpAssemble Raspberry Pi with Sense HAT
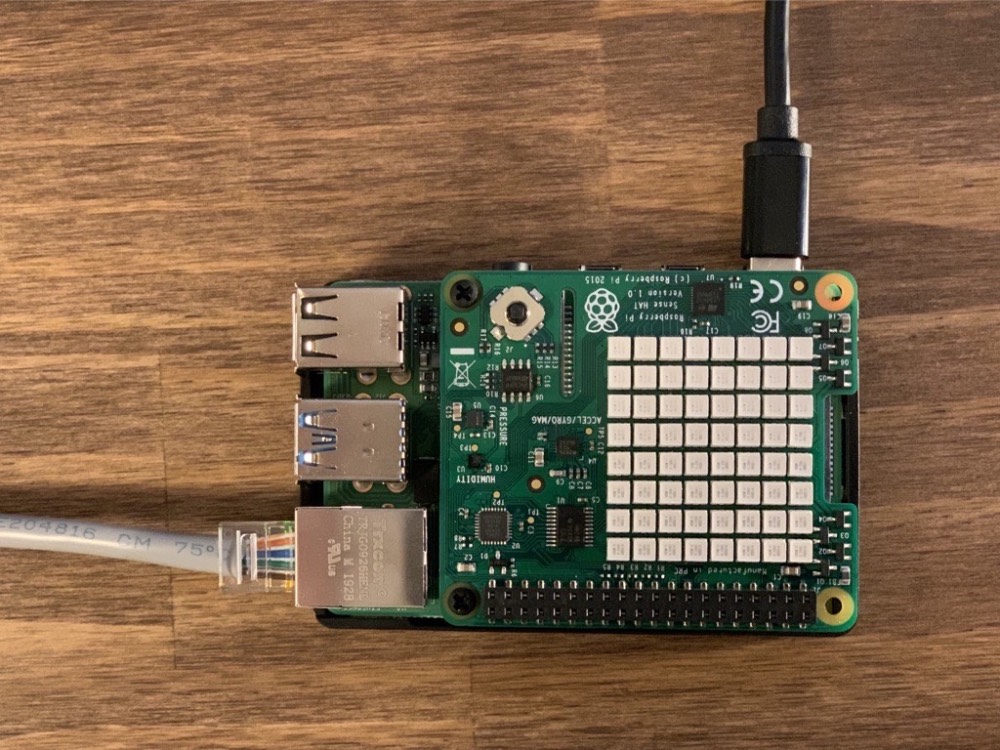
Before I installed the operating system, I went ahead and installed the Sense HAT. The Sense HAT sits on top of the Raspberry Pi making use of GPIO pins, so all you need to do is line up the pins and push the Sense HAT down on top of the Raspberry Pi.
Since the Sense HAT makes use of all the pins in a planned way, we will be able to use the Sense HAT SDKs in various languages without needing to directly manage the connections.
As mentioned earlier, after installing the Sense HAT, you may notice that the top of the case does not fit. For development purposes, this may be fine, but if you want to use this in a production capacity, it is recommended to put the Raspberry Pi in a case.
Install Raspberry Pi OS
In order to use the brand new Raspberry Pi, an operating system must be installed. There are plenty of options available on the internet; however, One of the benefits of the kit is it comes with an operating system installer on the included micro SD card.
After inserting the micro SD card, plugging in the keyboard/mouse USB dongle, and plugging in the monitor HDMI cable, I powered on the Raspberry Pi. One of the preloaded OS installers was Raspbian, a Debian based Linux distribution. This is more than efficient for what we need to do, but you're welcome to pick the operating system that suites your needs.
Simply follow the on-screen instructions, and you'll be ready to go.
Moving forward, I'll assume you're logged in to your Raspberry Pi either directly with a monitor, keyboard, and mouse, or with an SSH or RDP session.
Sense HAT Getting Started
I was new to using the Sense HAT, so I went looking for getting started material. Immediately, I noticed a Getting Started page that walks through the various capabilities of the Sense HAT by using the Python SDK. It is very straight forward.
If you want to bypass the getting started guide, you could simply install the Sense HAT library and continue on.
$ sudo apt-get update
$ sudo apt-get install sense-hat
$ sudo reboot
Healthy Status
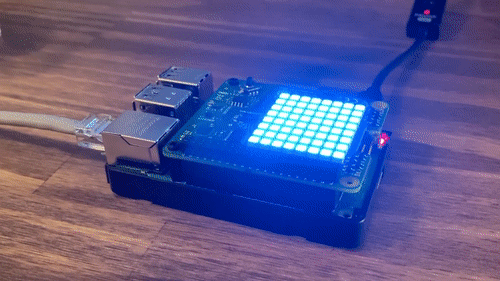
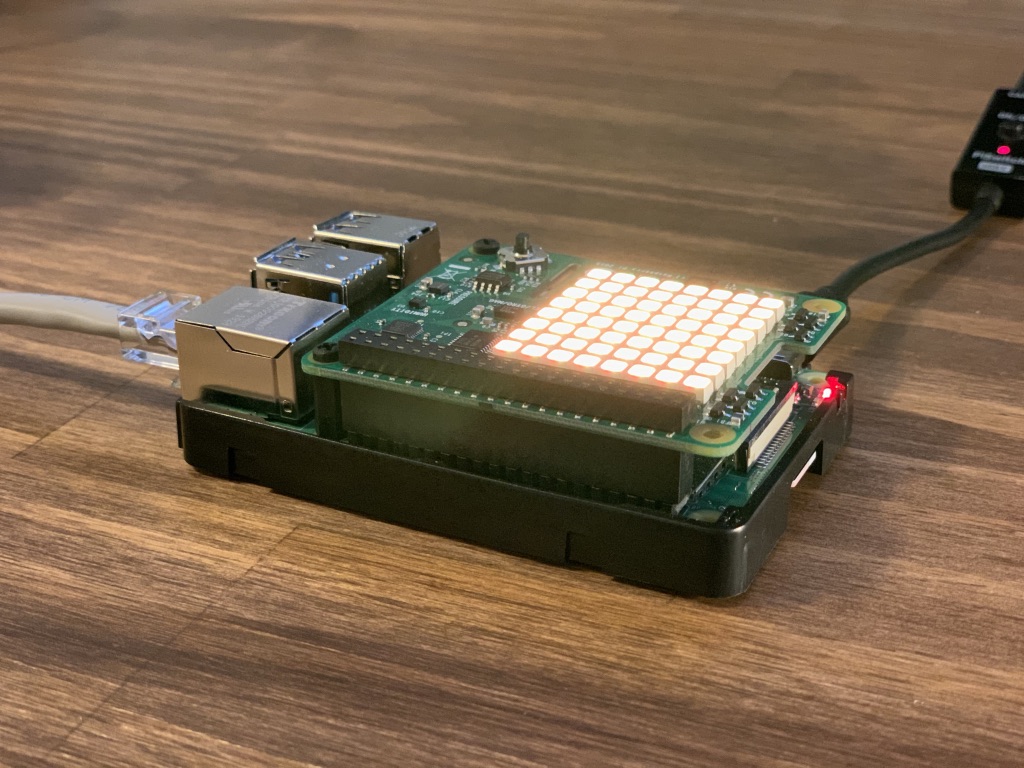
To get things rolling, I'll start by setting the LED color to a "healthy" one. You can match this color with one of your statuses if you'd like. I chose a blue color to better accommodate color-blindness, but a green color is often used as well.
$ nano ./andon.pyfrom sense_hat import SenseHat
sense = SenseHat()
healthy_status = (3, 169, 244)
def set_color(color):
# 8x8 grid on SenseHat
cells = 64
pixels = []
for x in range(cells):
pixels.append(color)
sense.set_pixels(pixels)
set_color(healthy_status)
$ python ./andon.pyAfter running this script, I saw the lights turn on to the blue color. Great success.
Now that the Sense HAT is working, I will move on setting up my Pingum organization.
Tagging
There are various ways to structure your data in Pingum. In my organization's event settings, I'm going to use a tag category of "Devices" and will create a tag for this Raspberry Pi.
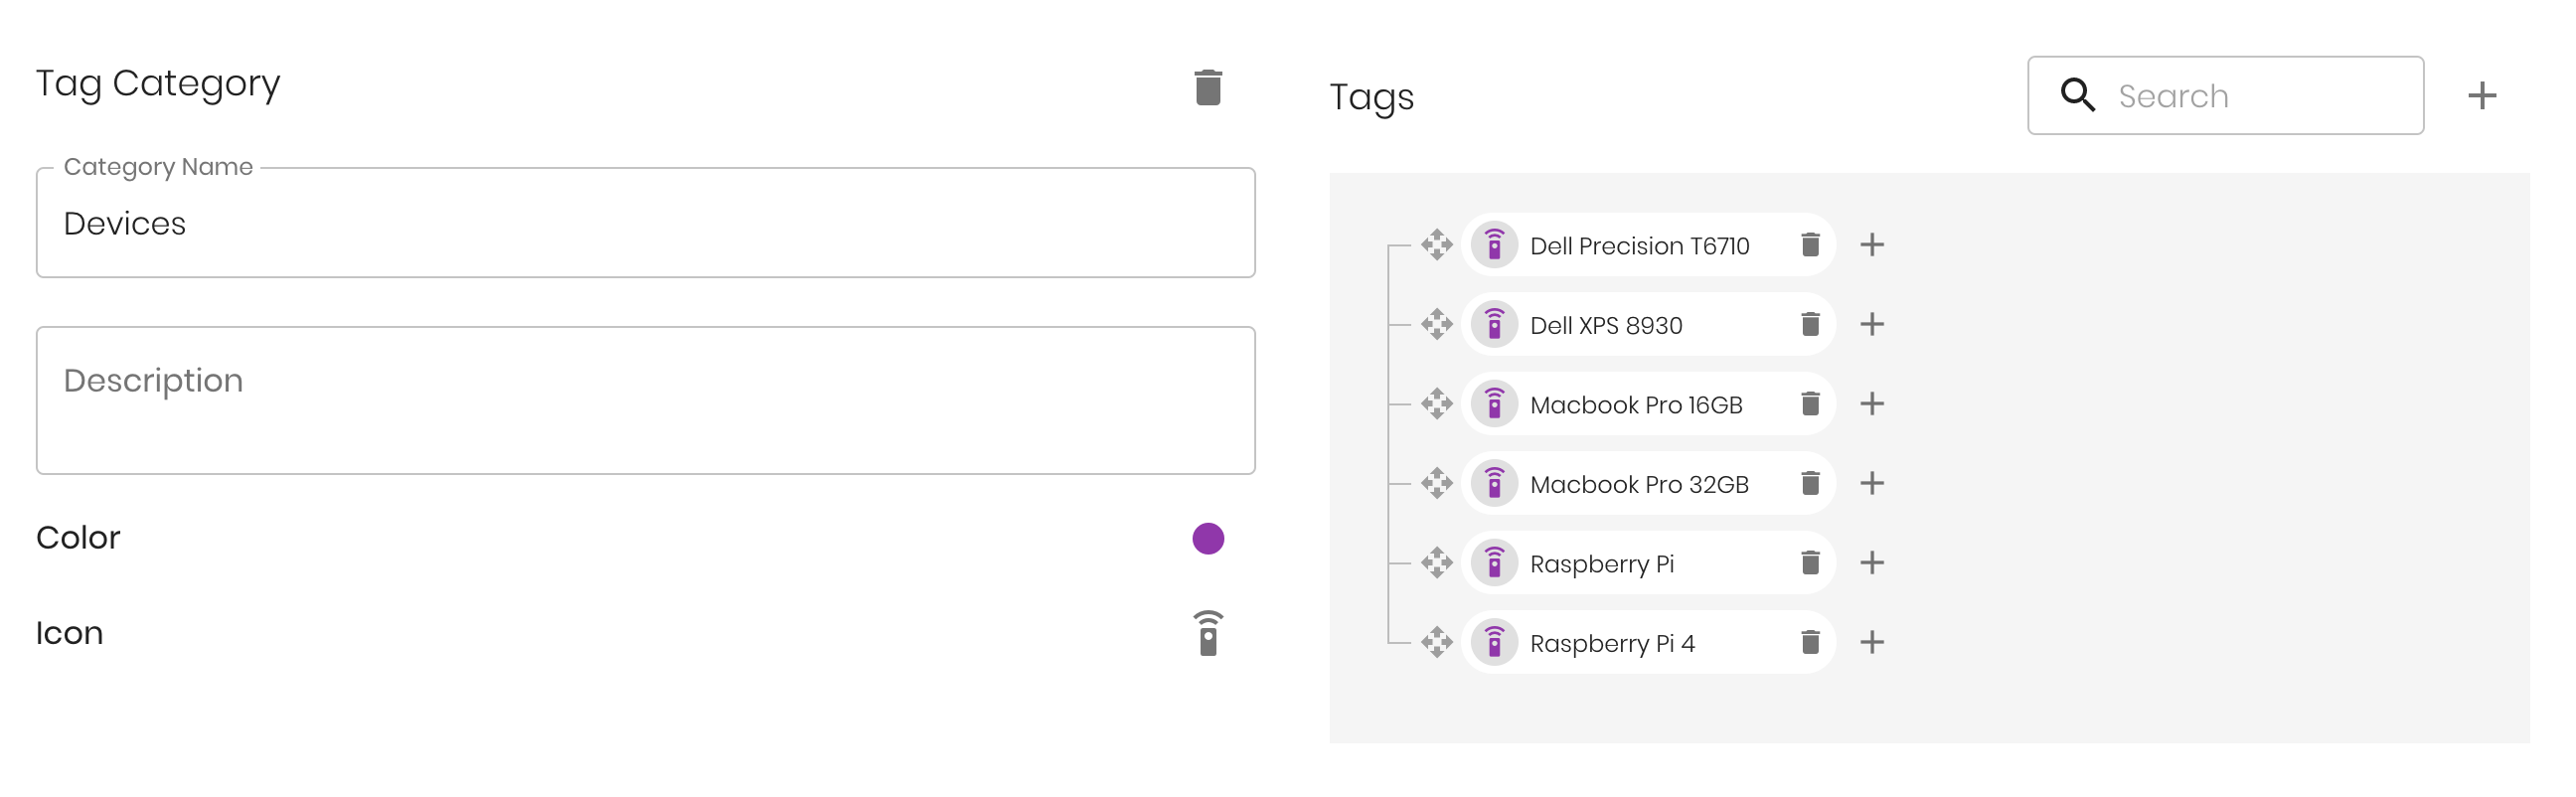
The idea would be to create a tag for each station location I want an andon light stack located and assign that location to its own Raspberry Pi device. Based on this tag, I can use the search API to find all active events with this tag.
I will need to submit the tag ID in the API filter, so I will need to lookup what that tag ID is. The IDs can be found in the tag section of the developer page.
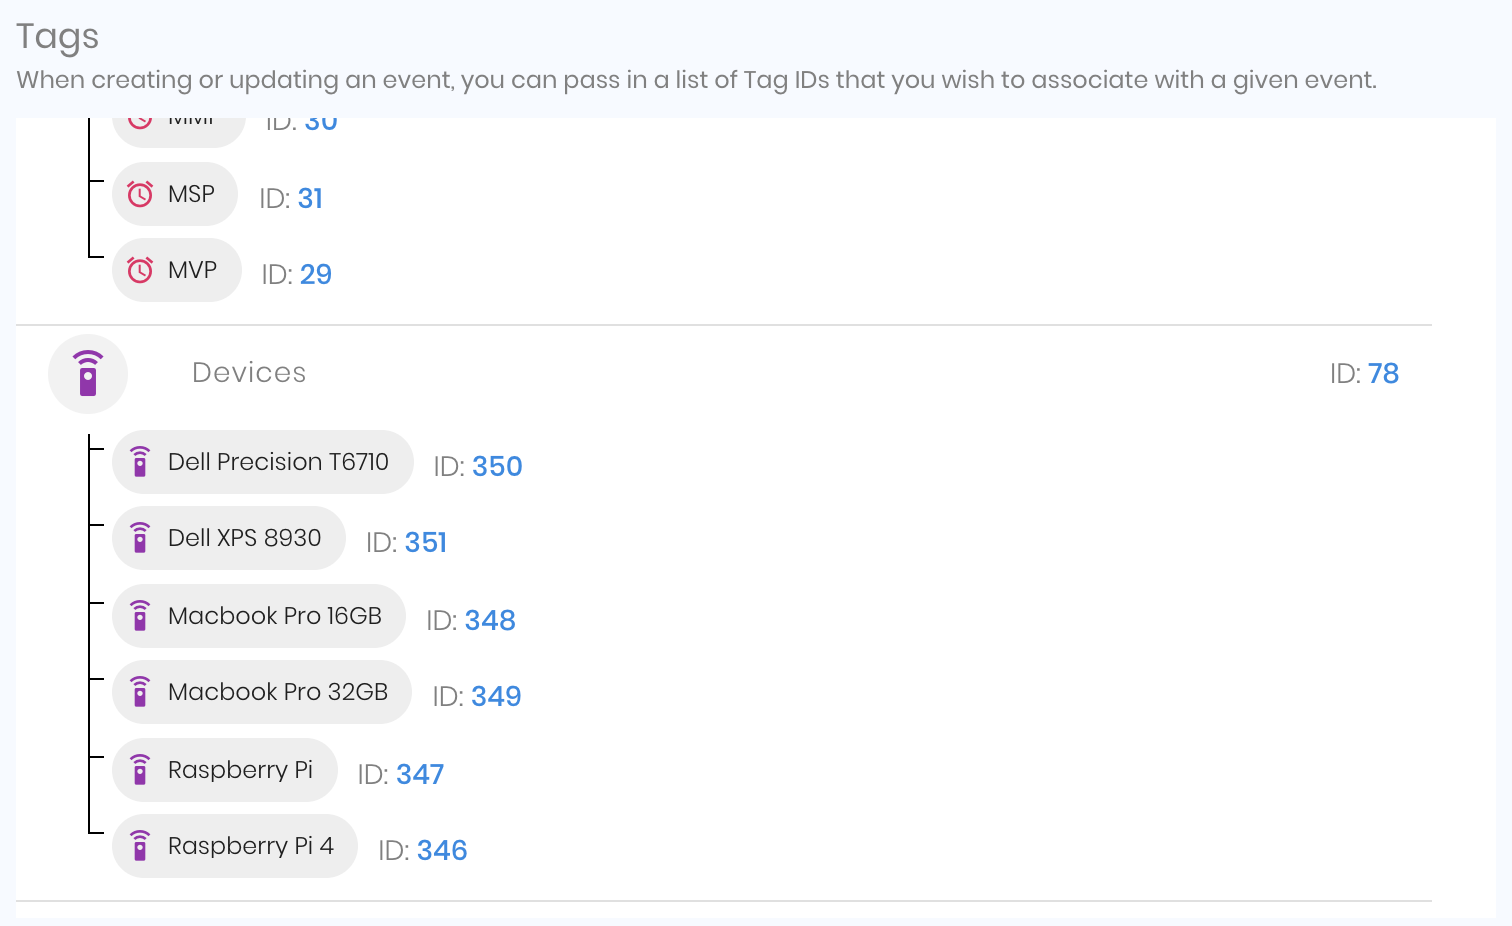
Make note of the tag ID to use in the API call later.
Search Active Events
The Pingum API documentation references the Search Events API. This provides a robust way of filtering active events down to the ones relevant to a specific use case.
I will use this API endpoint to get a list of active events for the tag I just created.
Access to the API
First, I'll make sure I can access this API. I will lookup my API Key in the developer page in my Pingum organization.
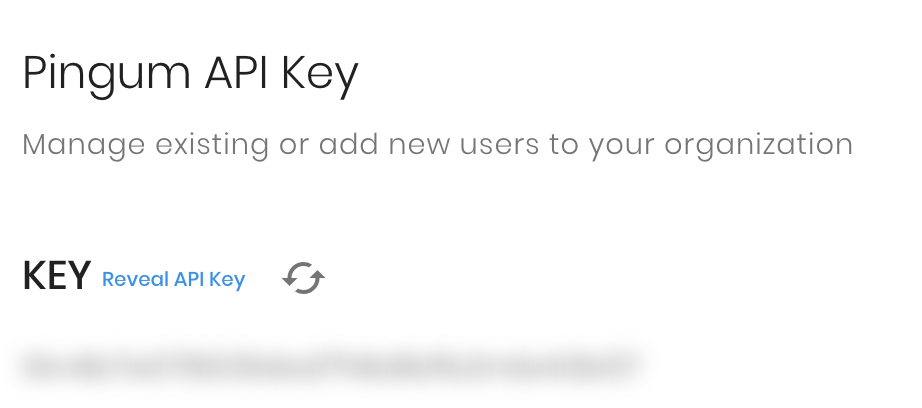
This value needs to be passed into the API call as the Authorization header.
I also need to pass in the X-Tenant for my organization. This will be the same as the subdomain for my organization.
It is recommended to set both of these values through environment variables.
Next, I'll set the tagConditions in the payload. This filter allows me to specify multiple groups of tag IDs called tag conditions. Tag IDs within a tag condition are evaluated using OR logic. Tag IDs across different tag conditions are evaluated using AND logic.
Since I only care about active Pingum events, I will also include a filter to turn off includeComplete.
from sense_hat import SenseHat
import os
import json
import requests

sense = SenseHat()

healthy_status = (3, 169, 244)
url = "https://event-api.pingum.io/api/v1"
tenant = os.environ["TENANT_NAME"]
apiKey = os.environ["API_KEY"]
headers = {
  "Content-Type": "application/json",
  "Authorization": apiKey,
  "X-Tenant": tenant
}

def set_color(color):
  # 8x8 grid on SenseHat
  cells = 64

  pixels = []
  for x in range(cells):
    pixels.append(color)
  sense.set_pixels(pixels)

def get_events():
  payload = {
    "tagConditions": [
      [346]
    ],
    "includeComplete": False
  }

  response = requests.post(url + "/events/search", data=json.dumps(payload), headers=headers).json()
  print(response)
  return response

get_events()
set_color(healthy_status)
When I run this app, I should see this result:
$ TENANT_NAME=yourtenant API_KEY=yourapikey python ./andon.py{
"content": [],
"pageable": {
"sort": {
"sorted": false,
"unsorted": true,
"empty": true
},
"pageSize": 20,
"pageNumber": 0,
"offset": 0,
"paged": true,
"unpaged": false
},
"last": true,
"totalElements": 0,
"totalPages": 0,
"sort": {
"sorted": false,
"unsorted": true,
"empty": true
},
"first": true,
"numberOfElements": 0,
"size": 20,
"number": 0,
"empty": true
}
And the Sense HAT should still have the blue color.
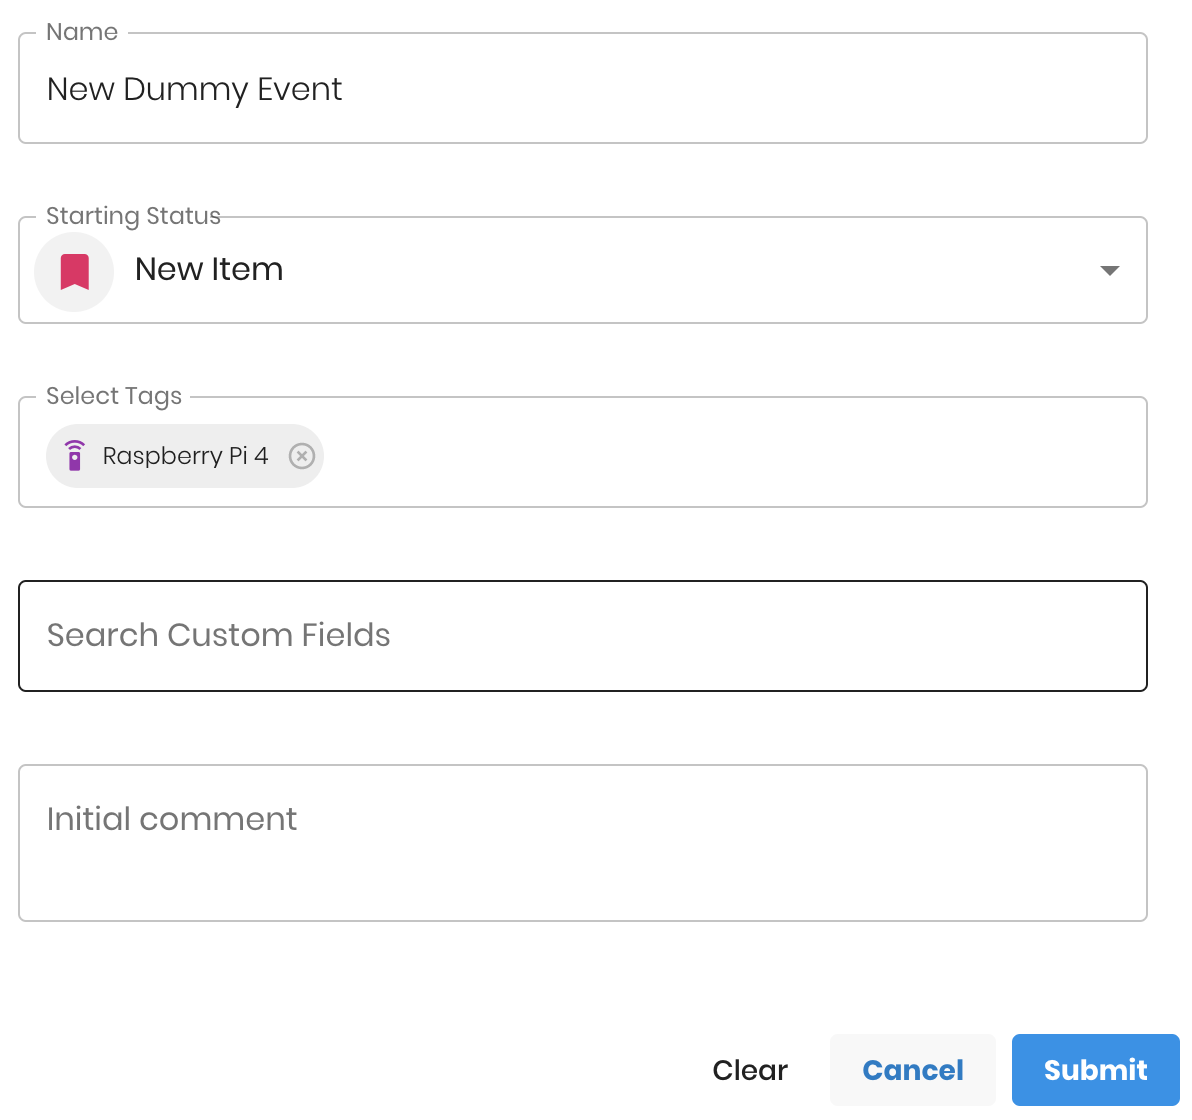
Create Dummy Pingum Event
Now that I am getting back a result from the Search Events API, I want to create a dummy event to test that I can get this event and all others raised in the future.
When I rerun the python app, the result should look something like this:
$ TENANT_NAME=yourtenant API_KEY=yourapikey python ./andon.py
{
  "content": [
    {
      "id": 800,
      "tenant": "yourtenantname",
      "name": "New Dummy Event",
      "description": "",
      "eventTemplateId": null,
      "tags": [
        {
          "id": 346,
          "name": "Raspberry Pi 4",
          "tagType": {
            "id": 78,
            "name": "Devices",
            "description": "",
            "archived": false,
            "tags": []
          },
          "archived": false
        }
      ],
      ...
      "currentEventStatus": {
        "id": 1392,
        "status": {
          "id": 50,
          "tenant": "henzelmann",
          "name": "New Item",
          "statusOrder": 1,
          "endingStatus": false,
          "archived": false
        },
        "startEvent": true,
        "completeEvent": false,
        "statusComment": "",
        "createdByName": "Brian Henzelmann",
        "createdByEmail": "brian@pingum.io",
        "createdDate": "2019-12-29T20:02:37.000+0000"
      },
      ...
    }
  ],
  ...
}
Now I have everything hooked up to get events for this device.
Set Unhealthy LED Color
With an active event, I can set the LED lights to an unhealthy color.
from sense_hat import SenseHat
import os
import json
import requests

sense = SenseHat()

healthy_status = (3, 169, 244)
unhealthy_status = (255, 0, 0)
url = "https://event-api.pingum.io/api/v1"
tenant = os.environ["TENANT_NAME"]
apiKey = os.environ["API_KEY"]
headers = {
  "Content-Type": "application/json",
  "Authorization": apiKey,
  "X-Tenant": tenant
}

def set_color(color):
  # 8x8 grid on SenseHat
  cells = 64

  pixels = []
  for x in range(cells):
    pixels.append(color)
  sense.set_pixels(pixels)

def get_events():
  payload = {
    "tagConditions": [
      [346]
    ],
    "includeComplete": False
  }

  response = requests.post(url + "/events/search", data=json.dumps(payload), headers=headers).json()
  return response

print("Checking Pingum events")
events = get_events()

current_status = healthy_status
if events["totalElements"] > 0:
  current_status = unhealthy_status
  print("Unhealthy")
else:
  print("Healthy")

set_color(current_status)
And when I run this, I can see:
$ TENANT_NAME=yourtenant API_KEY=yourapikey python ./andon.py
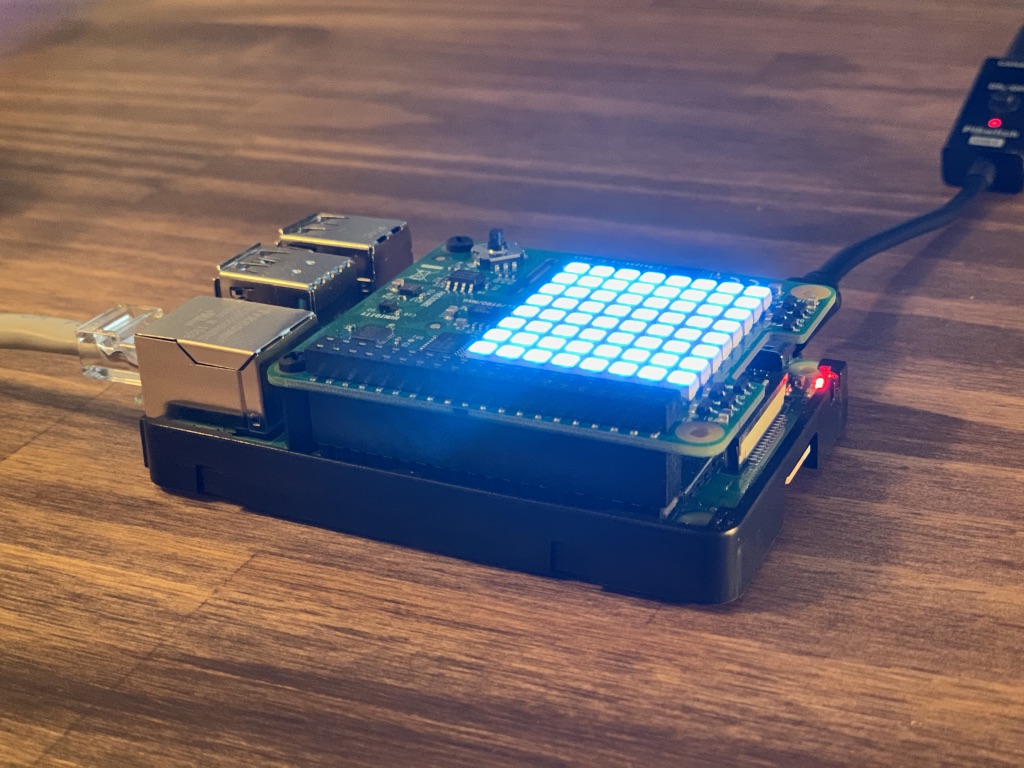
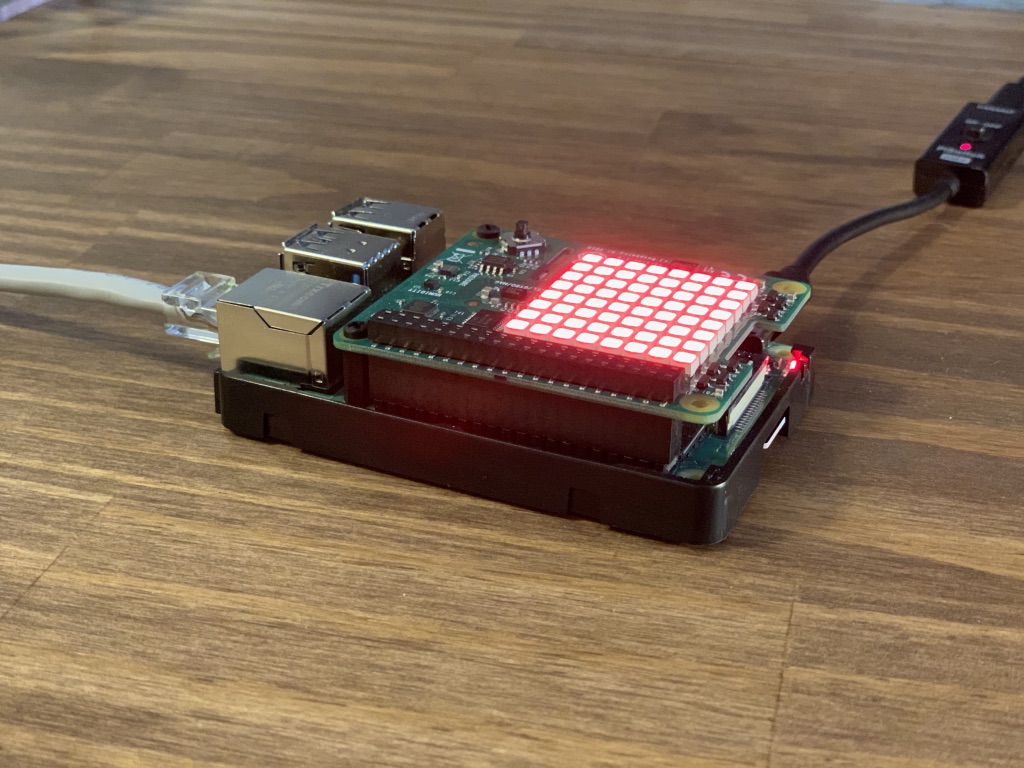
UnhealthyAnd I notice the Sense HAT change from blue to red.
Update LED Color
I don't want to re-run this script manually all the time. Plus once the event is created and the LED lights show an unhealthy color, I will want to track it and change the LED lights to match the current state.
To automate this, I will add a poll to the Search Events API. I will set the poll to 10 seconds to ensure the lights are updated regularly.
from sense_hat import SenseHat
import os
import json
import requests
import time

sense = SenseHat()

healthy_status = (3, 169, 244)
unhealthy_status = (255, 0, 0)
url = "https://event-api.pingum.io/api/v1"
tenant = os.environ["TENANT_NAME"]
apiKey = os.environ["API_KEY"]
headers = {
  "Content-Type": "application/json",
  "Authorization": apiKey,
  "X-Tenant": tenant
}

def set_color(color):
  # 8x8 grid on SenseHat
  cells = 64

  pixels = []
  for x in range(cells):
    pixels.append(color)
  sense.set_pixels(pixels)

def get_events():
  payload = {
    "tagConditions": [
      [346]
    ],
    "includeComplete": False
  }

  response = requests.post(url + "/events/search", data=json.dumps(payload), headers=headers).json()
  return response

while True:
  print("Checking Pingum events")
  events = get_events()

  current_status = healthy_status
  if events["totalElements"] > 0:
    current_status = unhealthy_status
    print("Unhealthy")
  else:
    print("Healthy")

  set_color(current_status)

  print("Waiting 10 seconds")
  time.sleep(10)
Now when I run the python app, it continues to run and shows me this:
$ TENANT_NAME=yourtenant API_KEY=yourapikey python ./andon.py
Checking Pingum events
Unhealthy
Waiting 10 seconds
Checking Pingum events
Unhealthy
Waiting 10 seconds
Checking Pingum events
Unhealthy
Waiting 10 seconds
...
The light is still red too.
Since the script is continuously checking for active events, I can go back to the Pingum dashboard and complete the event. Once I do that, the Sense HAT changes colors and I can see the following:
$ TENANT_NAME=yourtenant API_KEY=yourapikey python ./andon.py
Checking Pingum events
Unhealthy
Waiting 10 seconds
Checking Pingum events
Unhealthy
Waiting 10 seconds
Checking Pingum events
Unhealthy
Waiting 10 seconds
...
Checking Pingum events
Healthy
Waiting 10 seconds
...
Set LED Color Based on Status
Setting a hardcoded status color is fine, but Pingum already lets me manage status colors, so I would rather use the status color that comes back from the active event.
In order to have an active event to play with, I'll create another one.
Pingum status colors are saved using hex values, but the Sense HAT library uses RBG. So I installed the webcolors library. This will automatically convert the hex value to RGB for me.
$ pip install webcolorsNow I can grab the status color from the currentEventStatus instead of a hardcoded color.
from sense_hat import SenseHat
import os
import json
import requests
import time
import webcolors

sense = SenseHat()

healthy_status = (3, 169, 244)
url = "https://event-api.pingum.io/api/v1"
tenant = os.environ["TENANT_NAME"]
apiKey = os.environ["API_KEY"]
headers = {
  "Content-Type": "application/json",
  "Authorization": apiKey,
  "X-Tenant": tenant
}

def set_color(color):
  # 8x8 grid on SenseHat
  cells = 64

  pixels = []
  for x in range(cells):
    pixels.append(color)
  sense.set_pixels(pixels)

def get_events():
  payload = {
    "tagConditions": [
      [346]
    ],
    "includeComplete": False
  }

  response = requests.post(url + "/events/search", data=json.dumps(payload), headers=headers).json()
  return response

def get_status(status_id):
  return requests.get(url + "/statuses/" + str(status_id), headers=headers).json()

while True:
  print("Checking Pingum events")
  events = get_events()

  current_status = healthy_status
  if events["totalElements"] > 0:
    status = get_status(str(events["content"][0]["currentEventStatus"]["status"]["id"]))
    current_status = webcolors.hex_to_rgb(status["iconColor"])
    print("Status: " + status["name"] + " Color: " + status["iconColor"])
  else:
    print("Healthy")

  set_color(current_status)

  print("Waiting 10 seconds")
  time.sleep(10)
The andon color on the Sense HAT now matches the Pingum status.
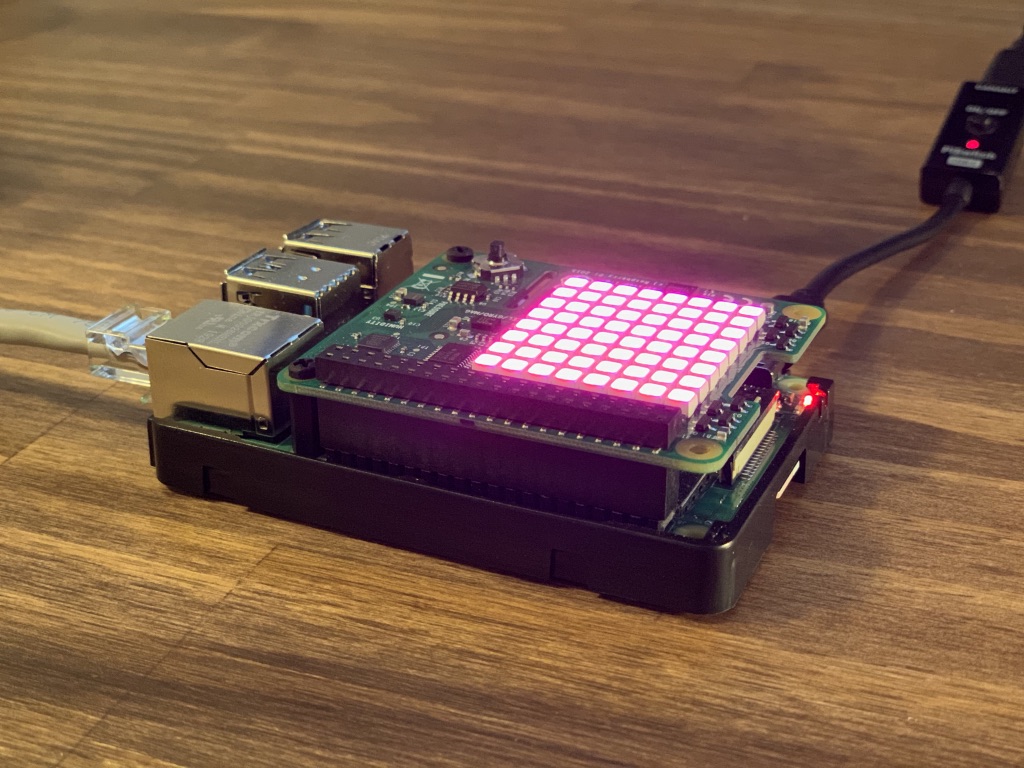
It will even change the andon color based on the Pingum status of the active event.
Clear Color on Exit
If the app crashes, I want to make sure the color on the Sense HAT is cleared. This ensures m andon light stack doesn't have a false positive, and it acts as another queue to me that something is wrong with the andon system.
from sense_hat import SenseHat
import os
import json
import requests
import time
import webcolors
import atexit

sense = SenseHat()

healthy_status = (3, 169, 244)
url = "https://event-api.pingum.io/api/v1"
tenant = os.environ["TENANT_NAME"]
apiKey = os.environ["API_KEY"]
headers = {
  "Content-Type": "application/json",
  "Authorization": apiKey,
  "X-Tenant": tenant
}

def set_color(color):
  # 8x8 grid on SenseHat
  cells = 64

  pixels = []
  for x in range(cells):
    pixels.append(color)
  sense.set_pixels(pixels)

def get_events():
  payload = {
    "tagConditions": [
      [346]
    ],
    "includeComplete": False
  }

  response = requests.post(url + "/events/search", data=json.dumps(payload), headers=headers).json()
  return response

def get_status(status_id):
  return requests.get(url + "/statuses/" + str(status_id), headers=headers).json()

def exit_handler():
  print("Clearing color")
  sense.clear()

atexit.register(exit_handler)

while True:
  print("Checking Pingum events")
  events = get_events()

  current_status = healthy_status
  if events["totalElements"] > 0:
    status = get_status(str(events["content"][0]["currentEventStatus"]["status"]["id"]))
    current_status = webcolors.hex_to_rgb(status["iconColor"])
    print("Status: " + status["name"] + " Color: " + status["iconColor"])
  else:
    print("Healthy")

  set_color(current_status)

  print("Waiting 10 seconds")
  time.sleep(10)
When I kill the python app using CTRL+C, the andon color goes away.
Handle Multiple Events
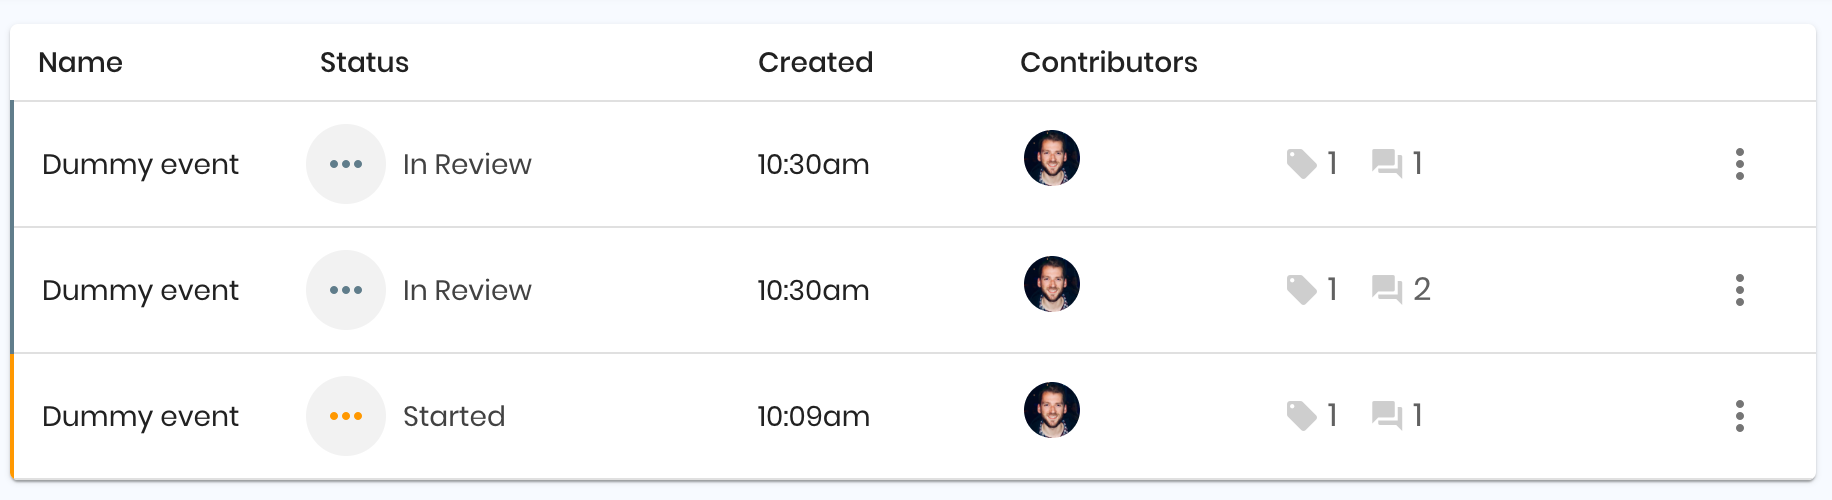
It is possible to have multiple events in Pingum that use the Raspberry Pi 4 tag. In this case of multiple events, I want to show the andon status color of the most critical state.
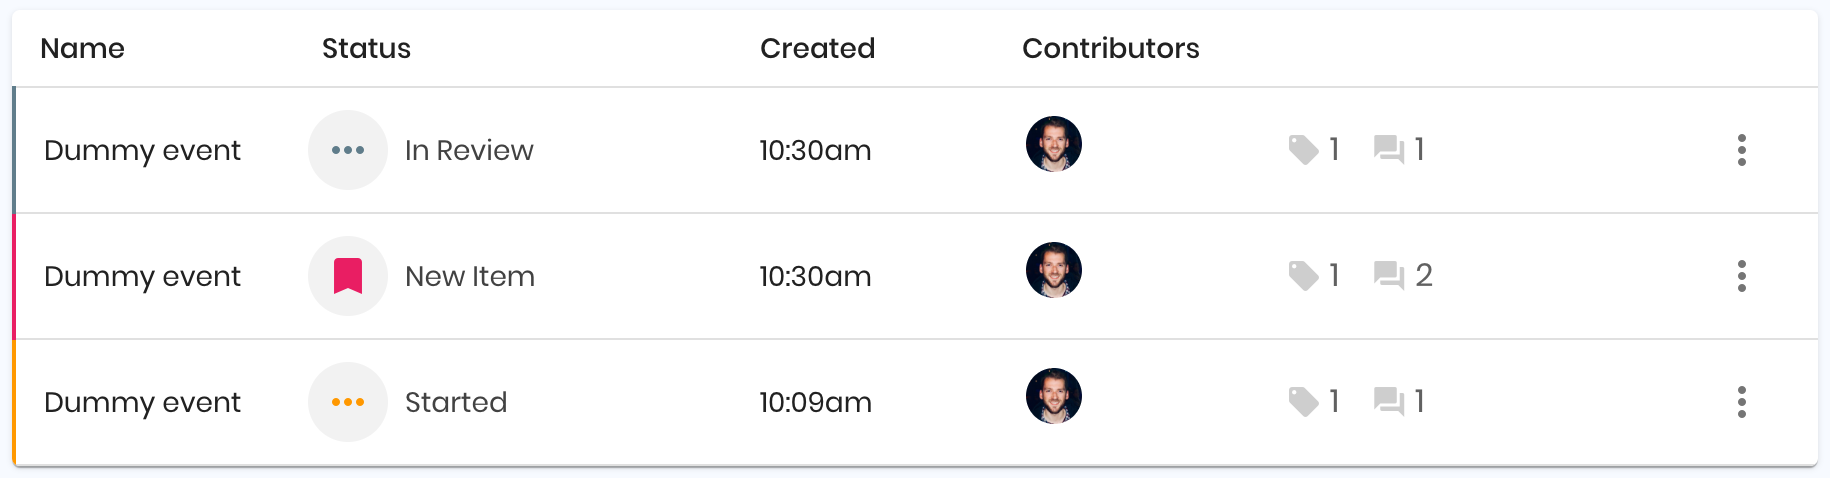
Luckily, the Pingum statuses do have a status order associated with them, so I can easily determine the most critical andon state.
from sense_hat import SenseHat
import os
import json
import requests
import time
import webcolors
import atexit

sense = SenseHat()

healthy_status = (3, 169, 244)
url = "https://event-api.pingum.io/api/v1"
tenant = os.environ["TENANT_NAME"]
apiKey = os.environ["API_KEY"]
headers = {
  "Content-Type": "application/json",
  "Authorization": apiKey,
  "X-Tenant": tenant
}

def set_color(color):
  # 8x8 grid on SenseHat
  cells = 64

  pixels = []
  for x in range(cells):
    pixels.append(color)
  sense.set_pixels(pixels)

def get_events():
  payload = {
    "tagConditions": [
      [346]
    ],
    "includeComplete": False
  }

  response = requests.post(url + "/events/search", data=json.dumps(payload), headers=headers).json()
  return response

def get_status(status_id):
  return requests.get(url + "/statuses/" + str(status_id), headers=headers).json()

def exit_handler():
  print("Clearing color")
  sense.clear()

atexit.register(exit_handler)

while True:
  print("Checking Pingum events")
  events = get_events()

  current_status = healthy_status
  if events["totalElements"] > 0:
    mostCriticalStatus = events["content"][0]["currentEventStatus"]["status"]
    for event in events["content"]:
      if (event["currentEventStatus"]["status"]["statusOrder"] < mostCriticalStatus["statusOrder"]):
        mostCriticalStatus = event["currentEventStatus"]["status"]
    status = get_status(mostCriticalStatus["id"])
    current_status = webcolors.hex_to_rgb(status["iconColor"])
    print("Status: " + status["name"] + " Color: " + status["iconColor"])
  else:
    print("Healthy")

  set_color(current_status)

  print("Waiting 10 seconds")
  time.sleep(10)
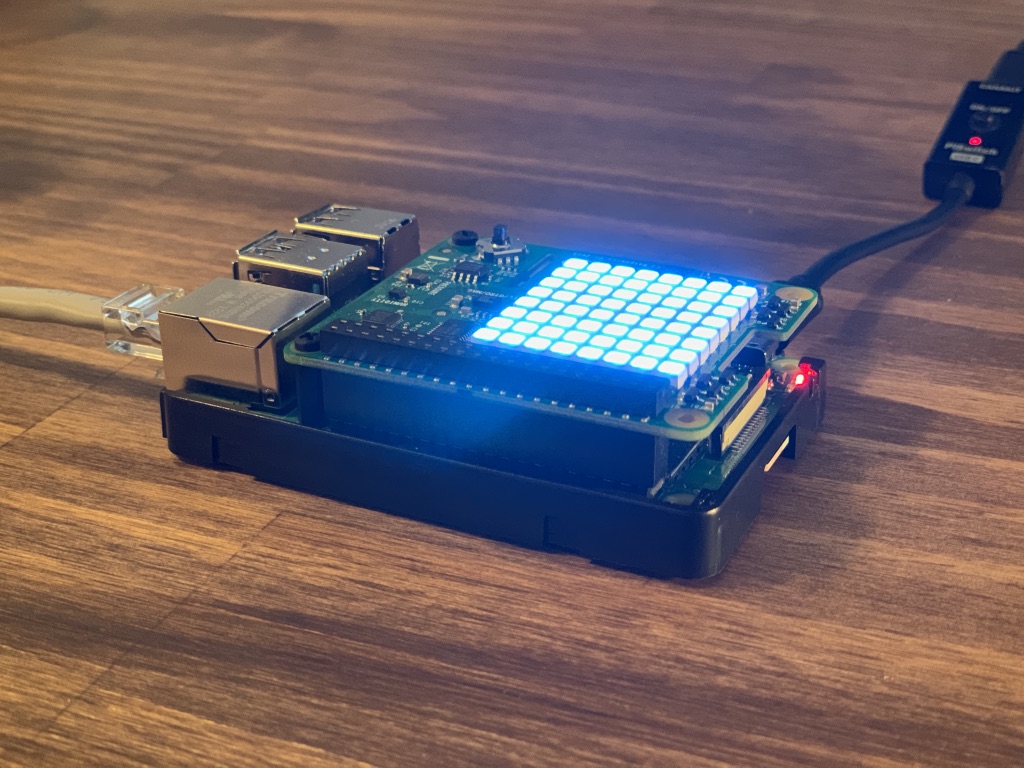
Now if two or more events are active, The python app will set the andon status color based on the lowest status order.
Once the lowest status order changes, I see the andon status color change.

The grey color shows up a bit bright in the picture, but it is correct.
Next Steps
From here, you might want to look at various next steps. This should be a great starting point, but you will likely want to expand. The code could probably be cleaned up and better optimized. You might want to scale to multiple devices spanning different operations, stations, and lines. You might also want to review your current status workflow and determine how to best optimize.
In future posts, we will expand the andon system by showing you how to trigger Pingum events from the button on the Sense HAT joystick, how to automatically trigger Pingum events from reading sensor data, and how to stream data into Pingum and set thresholds to automatically trigger events.
More to come.
Last updated: 12/30/2019 by Brian Henzelmann